A Guide to Generating SBOM with Syft and Grype
Updated September 8, 2025

AI Summary
In the evolving landscape of software development, where dependencies and third-party packages are increasingly baked into the fabric of our applications, understanding and managing the risk associated with these components has become paramount.
For instance, the discovery of the Log4j vulnerability at the end of 2021 or the XZ Utils backdoor last week sent shockwaves through the industry. As critical components used in countless applications worldwide, the urgency to ascertain whether systems were at risk highlighted a significant challenge: the difficulty of tracking and managing software dependencies. Those events underscored the vital need for comprehensive visibility into the software supply chain—a need that Software Bills of Materials (SBOMs) tools like Syft are uniquely positioned to fulfill.
Software Bill of Materials (SBOM) is a comprehensive inventory that details the "ingredients" of software, including libraries, packages, and the licenses under which they are provided. The SBOM is not merely a list; it is a critical tool for software transparency, enabling better security, compliance, and dependency management.
Why SBOM?
In the past, managing and tracking the numerous components that constitute a software application was a daunting task, which often led to security vulnerabilities, licensing non-compliance, and operational risks slipping into production due to the opaque nature of software dependencies.
As a result, many software buyers will require a complete list of open source components within an application to ensure there are no risks in the software supply chain.
The SBOM addresses these challenges by encapsulating vital information about each component, such as the package name, version, author, locations where it’s used and the licenses it is distributed under and known vulnerabilities associated with these components. This level of detail not only aids in understanding the software composition but also in assessing the potential impact of vulnerabilities or license non-compliance on the application and its users.
What does an SBOM Contain?
An SBOM goes beyond mere listing; it encapsulates vital information about each component, such as the package name, version, author, locations where it’s used, the licenses it is distributed under and known vulnerabilities associated with it. This level of detail not only aids in understanding the software composition but also in assessing the potential impact of vulnerabilities or license non-compliance on the application and its users.
Enter Syft and Grype by Anchore
To streamline the generation and management of SBOMs, tools like Syft and Grype emerged as indispensable assets. Syft, a CLI tool and library by Anchore with over 5.4K stars on GitHub, excels in generating SBOMs from container images and filesystems.
Syft does that by scanning the software artifacts and producing a detailed SBOM in various formats. These s formats include JSON, CycloneDX, and SPDX, offering flexibility in how the SBOM can be consumed and integrated into the development and security workflows.
Grype, another tool by Anchore with 7.4K stars, complements Syft by scanning the generated SBOMs to identify and report vulnerabilities associated with the software components. Grype provides detailed information about each vulnerability, such as the ID, severity, CVSS score, and recommendations for mitigation – enriching the SBOM with actionable insights to enhance the application's security posture.
In this example, we will demonstrate how to practically generate an SBOM of your stack with Syft, and then scan it for vulnerabilities with Grype.
Practical Applications
For the demo, we used the OWASP NodeGoat project - a deliberately insecure web application developed by OWASP to serve as an educational tool designed to teach about the OWASP Top 10 vulnerabilities specifically within Node.js application. This is a good way to understand how Syft and Grype work together to provide a better understanding of the software components in your project and how to better secure them.
Installing Syft and Grype
Before leveraging the capabilities of Syft and Grype, installation is the first step. These CLI tools are designed to be easily installable on various platforms, ensuring a smooth setup process.
Install Syft:
curl -sSfL https://raw.githubusercontent.com/anchore/syft/main/install.sh | sh -s -- -b /usr/local/bin
Install Grype:
curl -sSfL https://raw.githubusercontent.com/anchore/grype/main/install.sh | sh -s -- -b /usr/local/bin
Once completed successfully, Syft and Grype will be accessible through your terminal application of choice.
Generating SBOMs with Syft
Syft allows you to scan container images or filesystems, producing SBOMs in various formats. Here are a few examples showcasing its versatility:
By running the command:
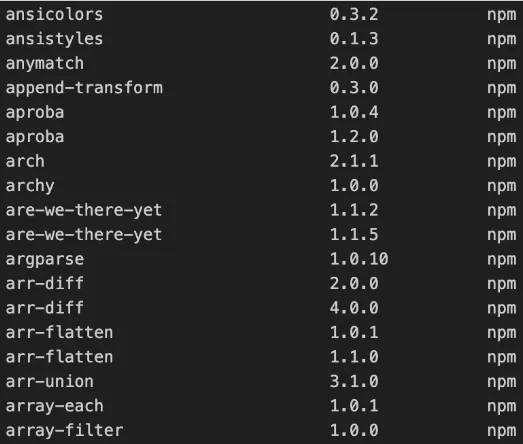
syft NodeGoat
You will be able to scan the NodeGoat folder, and display the SBOM components in the terminal (as demonstrated in the screenshot below):
Next, we will scan a container image, and define the output in CycloneDX format:
syft nodegoat-web:latest -o cyclonedx-json > sbom_cyclonedx.json
CycloneDX is an open-source and machine-readable SBOM format developed by the OWASP community, in order to provide greater standardization around generating, exchanging, and analyzing SBOMs. SPDX (Software Package Data Exchange) is another open-source, machine-readable SBOM format developed by the Linux Foundation, aimed at standardizing the documentation and sharing of software components, licenses, and copyrights. SPDX is also supported by Syft.
With Syft you can also generate an SBOM for a container image in JSON format by running the following command:
syft nodegoat-web:latest -o json > sbom.json
Use -o json or -o syft-json to get as much information as possible out of Syft.
Extracting Specific Data with Syft
Now that we know how to run basic commands with Syft, we can learn how to extract important data. Syft's output can be processed to extract specific data points, such as package names, versions, and licenses
For parsing the JSON file, I’ll use jq, a command-line tool for processing JSON data. It allows for efficient data manipulation, filtering, and transformation directly in the shell. For more details on jq, check the official documentation here.
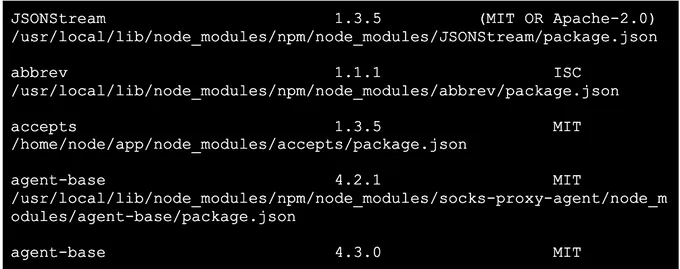
To extract the package name, version, and license in a tabular format - enabling visibility into all packages and licenses used to create the product, run the following command:
syft nodegoat-web:latest -o json | jq -r '.artifacts[] | [.name, .version, (if .licenses == [] then "No license" else [ .licenses[].value ] | join(", ") end)] | @tsv' | awk -F'\t' 'BEGIN {print "Package Name\tPackage Version\tLicense"; print "-------------\t---------------\t-------"} {printf "%s\t%s\t%s\n", $1, $2, $3}'
This will output the following snippet for further analysis:

If you prefer to receive the output in JSON format, run the following command:
syft nodegoat-web:latest -o json | jq '[.artifacts[] | {packageName: .name, packageVersion: .version, license: (if .licenses | length == 0 then "No license" else [ .licenses[].value ] | join(", ") end)}]' > packages_info.json
To extract the location of each package, run the following command:
syft nodegoat-web:latest -o json | jq '[.artifacts[] | {packageName: .name, packageVersion: .version, license: (if .licenses | length == 0 then "No license" else [ .licenses[].value ] | join(", ") end), locations: [.locations[].path]}]' > packages_with_locations.json
This command will show you package name, version, license, and location of each package:

This may create separate sections for the same Package version and name but with different locations. The following command will unify these sections into one.
syft nodegoat-web:latest -o json | jq '[.artifacts[] | {packageName: .name, packageVersion: .version, license: (if .licenses | length == 0 then "No license" else [ .licenses[].value ] | join(", ") end), locations: [.locations[].path]}] | group_by(.packageName + .packageVersion) | map({packageName: .[0].packageName, packageVersion: .[0].packageVersion, license: .[0].license, locations: map(.locations[]) | unique})' > grouped_packages_with_locations.json
The following command provides a similar output ot the previous command, just in a tabular view:
syft nodegoat-web:latest -o json | jq -r '[.artifacts[] | {packageName: .name, packageVersion: .version, license: (if .licenses | length == 0 then "No license" else [ .licenses[].value ] | join(", ") end), locations: [.locations[].path]}] | group_by(.packageName + .packageVersion) | map({packageName: .[0].packageName, packageVersion: .[0].packageVersion, license: .[0].license, locations: map(.locations[]) | unique}) | .[] | [.packageName, .packageVersion, .license, (.locations | join(", "))] | @tsv' | column -t -s $'\t' > grouped_packages_with_locations_tabular.txt
Below is a snippet from the output of this analysis where each line contains the package name, version, license and location.
Below we’ll demonstrate how you can augment with additional filters, for other governance and policies applied in your engineering organization.
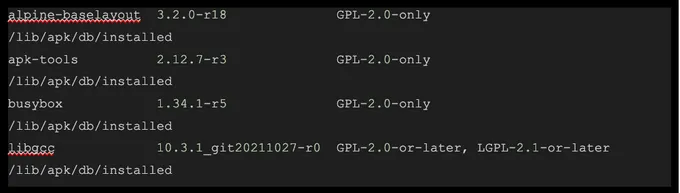
You can filter by GPL, to focus on packages that typically violate the organization’s policy by running the following command:
syft nodegoat-web:latest -o json | jq -r '[.artifacts[] | {packageName: .name, packageVersion: .version, license: (if .licenses | length == 0 then "No license" else [ .licenses[].value ] | join(", ") end), locations: [.locations[].path]}] | group_by(.packageName + .packageVersion) | map({packageName: .[0].packageName, packageVersion: .[0].packageVersion, license: .[0].license, locations: map(.locations[]) | unique}) | map(select(.license | test("GPL"))) | .[] | [.packageName, .packageVersion, .license, (.locations | join(", "))] | @tsv' | column -t -s $'\t'> gpl_filtered.json
Below is a snippet of results that show the GPL licensed components in your codebase:
Through the examples above we’ve demonstrated how Syft can be used to provide a detailed inventory of all software components within a product, including open-source packages. This transparency is crucial for understanding what open-source components are used, their versions, and licenses.
Now we will dive into how to take this one step further with Grype to properly analyze your SBOM and supply chain risk and exposure to vulnerabilities.
Identifying Vulnerabilities with Grype
Once you have extracted your SBOM in your preferred format with Syft, Grype will scan the SBOMs to identify and report vulnerabilities, enriching the SBOM with crucial security insights.
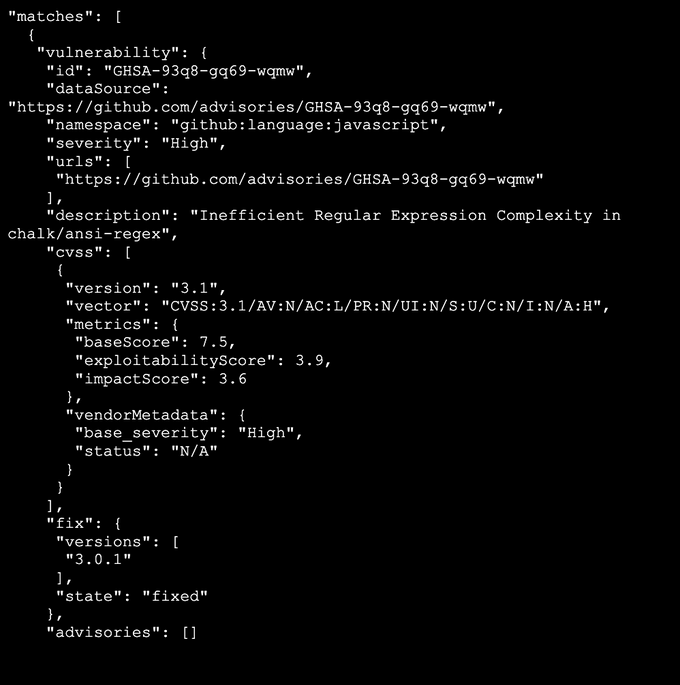
In the terminal, you can generate a vulnerability report in JSON format by running the following command:
grype sbom:sbom.json -o json > vulnerabilities.json
Below is a snippet from the analysis output:
Combining SBOM and Vulnerability Data
A good way to gain a comprehensive view of software components and their security posture is by combining the output from your SBOM with the relevant vulnerability data, to get a 360 view of your technology stacks and their current risk exposure. To do so, a Python script can be used to integrate the vulnerability data from Grype into the SBOM generated by Syft..
Run this Python script in your terminal. Make sure to update the correct paths for grouped_packages_path, vulnerabilities_path and output_path, which will store the combined version of the SBOM report and vulnerabilities data.import json
def add_vulnerabilities_to_packages(grouped_packages_path, vulnerabilities_path, output_path):
# Load grouped packages
with open(grouped_packages_path, 'r') as f:
grouped_packages = json.load(f)
# Load vulnerabilities
with open(vulnerabilities_path, 'r') as f:
vulnerabilities_data = json.load(f)['matches']
# Add vulnerabilities to packages
for package in grouped_packages:
package_name = package['packageName']
package_version = package['packageVersion']
relevant_vulnerabilities = [
{
"id": match['vulnerability']['id'],
"dataResource": match['vulnerability'].get('dataSource', 'N/A'),
"description": match['vulnerability'].get('description', 'No description available'),
"fixVersion": ', '.join(match['vulnerability']['fix']['versions']) if match['vulnerability'].get('fix', None) else "No fix version available"
}
for match in vulnerabilities_data
if match['artifact']['name'] == package_name and match['artifact']['version'] == package_version
]
if not relevant_vulnerabilities:
relevant_vulnerabilities = [{"id": "None", "dataResource": "N/A", "description": "No vulnerabilities found", "fixVersion": "N/A"}]
package['vulnerabilities'] = relevant_vulnerabilities
# Write the combined data to a new file
with open(output_path, 'w') as f:
json.dump(grouped_packages, f, indent=2)
if __name__ == "__main__":
# Define file paths
grouped_packages_path = '/path/to/grouped_packages_with_locations.json'
vulnerabilities_path = '/path/to/vulnerabilities.json'
output_path = '/path/to/final.json'
# Run the function
add_vulnerabilities_to_packages(grouped_packages_path, vulnerabilities_path, output_path)
With the combined SBOM generated and enriched with vulnerability data, you can now analyze and prioritize the vulnerabilities based on their severity, the criticality of the affected component to your application, and other factors like the availability of patches or workarounds.
Combining the SBOM with the vulnerability data makes it possible to:
- Understand Exposure: Know exactly which components are vulnerable and to what extent.
Prioritize Efforts: Focus remediation efforts where they are needed most, based on vulnerability severity and the criticality of affected components.
Comply with Regulations: Ensure your software complies with relevant security regulations and standards by having a clear record of components and vulnerabilities.
- Enhance Security Posture: Continuously improve your application’s security by regularly scanning for and remediating vulnerabilities.
By following these steps and utilizing the enriched vulnerability data from Syft and Grype, you can significantly enhance the security and compliance of your software projects.
Want to automate this?
Jit’s DevSecOps platform can help you automate SBOM generation, so you can always have visibility to the inventory of 3rd party packages that are used to create your software. With Jit, you can automatically generate updated SBOM reports every day, so you can be ready with the latest report whenever asked about software supply chain security or open source licensing risk.
Moreover, Jit unifies and automates all the security controls that are essential to protect a modern product, including SAST, SCA, Secret detection, IaC scanning, DAST, CSPM, container scanning, CI/CD security and more.
Conclusion
Through these examples, it's evident that Syft and Grype provide a powerful and flexible solution for generating SBOMs and analyzing vulnerabilities.
By incorporating these tools into software development and security processes, organizations can achieve greater transparency, security, and compliance in their software supply chain.
As we continue to navigate the complexities of software dependencies, the role of SBOMs and the tools that support them will undoubtedly become more integral to our efforts in securing the software supply chain.


