How to Automate OWASP ZAP
OWASP ZAP automation is a practical—and sometimes the best—way to test your web apps. Get the most of ZAP with a succinct automation guide.
Updated November 5, 2024

AI Summary
In a world of web application security, OWASP ZAP is seen as a trusted, user-friendly, and practical security scanner and proxy.
Even with all its prowess, ZAP has its vulnerabilities. For example, it can sometimes become slow and unstable, especially with large web applications. ZAP automations are always a good idea, but in these cases, they are a must.
Let's talk about how to automate OWASP ZAP and get those scripts, APIs, and plugins rolling.
What Is ZAP?
OWASP ZAP is the world’s most popular web app scanner that now sees over 4 Million “Check for Updates” calls per month (up from 1 million just earlier this year).
ZAP is free, open source, and used by people with a wide range of security experience—from newcomers to experienced security professionals—to get a better understanding of web application security posture.
The way OWASP ZAP works is by attacking your web apps like a malicious hacker would. The scanner attacks your running apps and shows you what attackers would find if they attacked the app instead.
» Check out how to use OWASP ZAP for penetration testing.
The ZAP Desktop
ZAP was built for flexibility and adoption, so it can be run in different ways, depending on your workflow. You can run ZAP:
- From the command line
- As a desktop application
- As a background daemon
In this blog post, I’ll show you how to automate ZAP from the OWASP ZAP command line, and how to set it up using the ZAP desktop application. The ZAP desktop app allows you to see exactly what ZAP does, and to tune ZAP to handle your app as effectively as possible.
ZAP requires Java 8+ to run locally, but you can also run ZAP in Docker and access it via a browser using Webswing. We won’t dive into this setup here, but you are welcome to reference the docs to get started.
If you use the docker option, make sure you start docker with the option to map a local drive so you can access the file you generate once the docker image stops.
On *nix systems, the docker option is -v $(pwd):/zap/wrk/:rw.
On Windows, you will need to replace $(pwd) with the full path of a suitable directory.

Open ASPM Platform
App + cloud security that developers love
Read reviewsCoverage
SAST, SCA, secrets detection, IaC scanning, DAST, CSPM, and other product security controls
Easy for developers to adopt
Automated scanning within dev environments
Automated prioritization
Automatically surface exploitable vulnerabilities in production
Easy onboarding
Integrate Jit with your Source Code Manager to enable one-click activation for all tools
Brief overview
Jit empowers developers to consistently and independently resolve vulnerabilities before production with automated scanning in their environment.
Rather than requiring developers to scroll through long vulnerability backlogs in different UIs, Jit provides immediate feedback on the security of every code change within GitHub, GitLab, or VsCode.
As a result, Jit makes it exceptionally easy for developers to adopt regular security testing within their environment.
Key features
- Unified SAST, SCA, secrets detection, IaC scanning, CSPM, DAST, and other product security controls
- Unified execution and UX for all security tools
- Fast and automated scanning within GitHub, GitLab, or VsCode
- Jit’s Context Engine determines whether a vulnerability is actually exploitable in production to prevent alert fatigue and long backlogs of irrelevant vulnerabilities
- Unified monitoring and reporting
Pros and cons
Easy for developers to adopt
Unifies all tools
Automated vulnerability prioritization based on runtime context
Fast onboarding across all repos
Not open source
The Automation Framework
The Automation Framework (AF) allows you to control ZAP with one yaml file. There are other ways to automate ZAP, but the AF is recommended for most OWASP ZAP users.
You can create the yaml file in a text editor. It's also possible to create yaml using the ZAP desktop— and since that allows you to test the plan as you go, that is the option we will use here.
1. Explore Your App Using the Spiders
The first thing to do is explore your app.
Apps designed for humans are typically best explored by humans, but that’s not a good approach for automation and eventual scaling.
We will start with a bit of manual exploration just to make sure we can connect to the app.
On the ZAP desktop, click on the “Manual Explore” button.
In the next form, fill in the URL of your target app, uncheck the “Enable HUD” box, and click on “Launch Browser”.
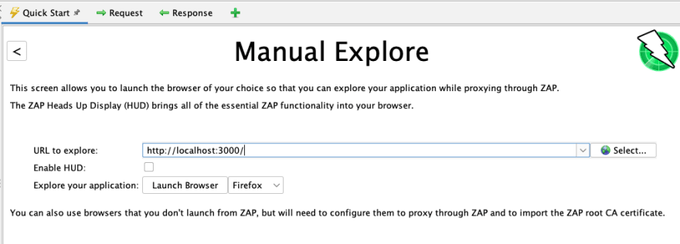
A browser should launch and display your target app. For this example, we'll use Firefox, but Chrome would work as well if that is the browser you installed.
Now look at the Sites tree—you should see at least one URL from your target app and probably more. In this case, I’m using OWASP Juice Shop as my target.
We'll be able to see how well each of the 2 spiders handles our app.
Right-click on the top node of your app in the Sites tree and select “Attack -> Spider…”
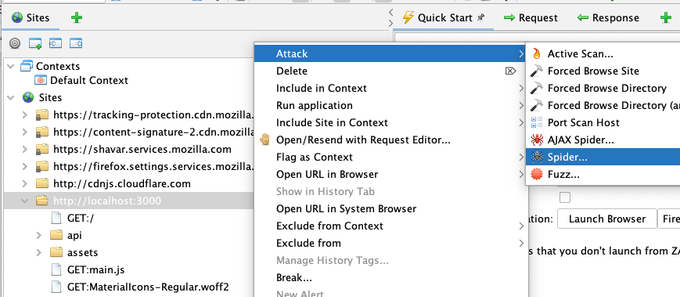
Then click “Start Scan."
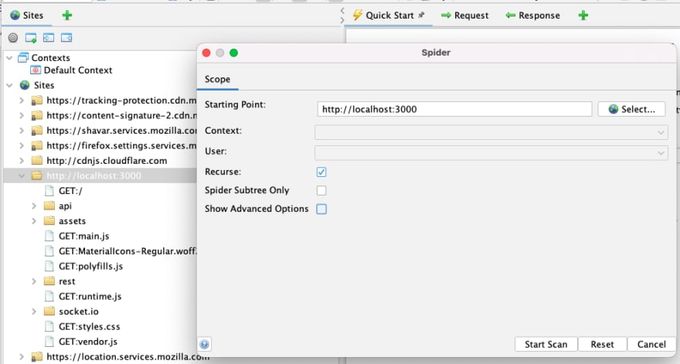
This spider should run very quickly, and it will tell you how many URLs were found and added to the Sites tree:
If your target app is a more traditional app, this should be enough.
However, if it is a more modern web app that makes heavy use of JavaScript, then you will need to use the AJAX spider.
Right-click on the top node of your app in the Sites tree and select “Attack -> AJAX Spider…”
Then click “Start Scan".
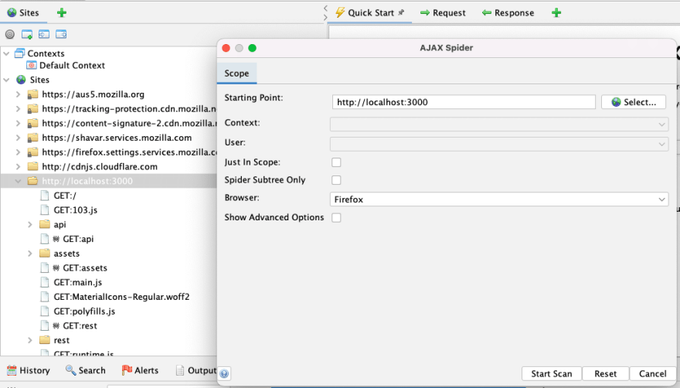
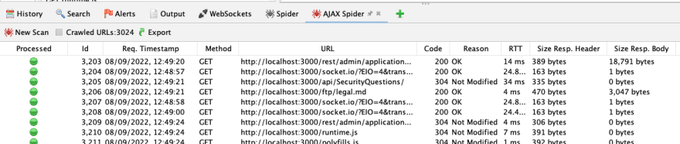
This spider will take longer—it launches browsers in order to click on UI elements. It will also tell you how many URLs it found:
2. Explore Your App by Importing API Definitions
If your app just defines an API then you won't be able to explore it either manually or via the OWASP ZAP spiders.
If you have an API definition, you can import it through the “Import” menu item. ZAP supports the import of the following definitions:
- Open API
- GraphQL
- WSDL
- HAR
3. Define a Context
You do not need to define a context if you are just using ZAP manually, but you should define one when using the OWASP ZAP Automation Framework.
Luckily, this is easy to do—just right-click the top node of your app in the Sites tree and select “Include in Context -> New Context“
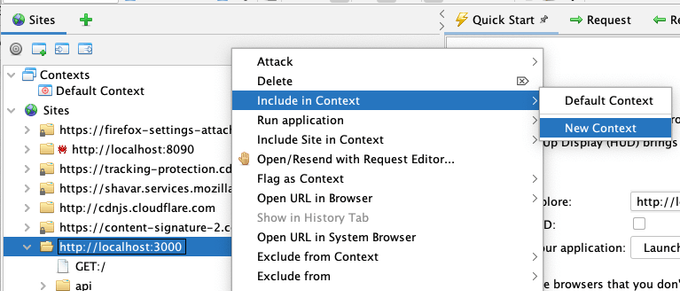
and optionally give it a meaningful name:

4. Create a Plan in the Desktop
We’re now ready to create the plan.
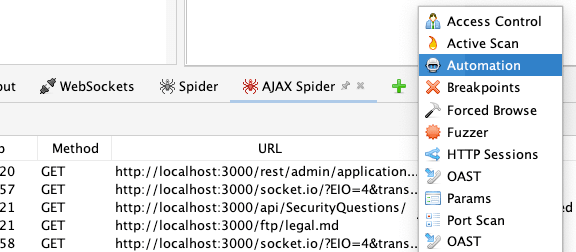
First, find the “Automation” tab.
ZAP has lots of tabs, so all but the most essential ones are hidden by default.
Click on the green plus tab in the bottom panel and select “Automation”
In the new Automation panel, click the “New Plan…” button:

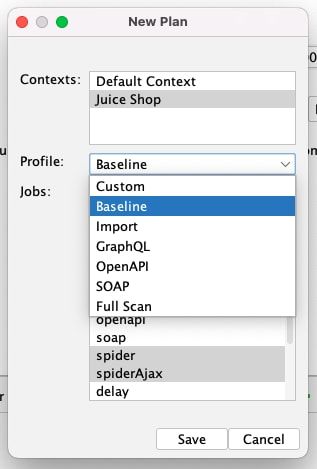
Select the context you defined above and then one of the following Profiles:
- Baseline: Passively scan your app and not attack it
- GraphQL: For a GraphQL API definition
- OpenAPI: For an OpenAPI / Swagger API definition
- SOAP: For a SOAP definition
- Full Scan: Attack your app (also used if you do not have an API definition)
A summary of your plan will now be displayed:
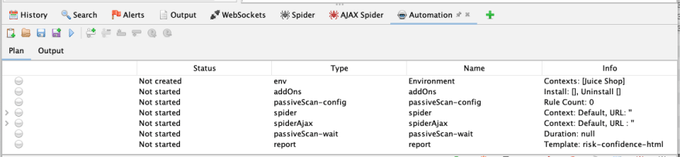
A plan can be much more flexible than these profiles, but they are the best option when just getting started.
The Baseline and Full automated scans include both the spider and the AJAX spider—you can remove either of them if they're not necessary. Do not remove both, as then the plan will not explore your app at all.
If you want to import an API definition in addition to spidering, add the relevant job.
You can edit a plan in the OWASP ZAP desktop:
- Double-clicking on any job brings up a dialog box for configuring the job
- “Add job…” button adds a job to the existing plan
- “Remove Job…” button removes the selected job
- “Move Job Up” button moves the selected job up one place
- “Move Job Down” button moves the selected job down one place
5. Passive Scanning
ZAP will passively scan every request initiated by ZAP or proxied through it. The profiles will all add two related jobs:
- PassiveScan-config allows you to fine-tune the passive scanner
- PassiveScan-wait means ZAP will wait until all the passive automated scan requests are completed—always run it after any job that explores your app
6. Active Scanning
The activeScan job runs the active scanner, which performs the actual attacks. Always include this job unless you only want to passively scan your app. Double-clicking on the job allows you to fine-tune the active automated scan rules.
7. Generating a Report
The report job—not surprisingly—has the task of generating a report. Zaproxy provides a variety of ZAP report templates with different options and an updated list with examples of each.
8. Authentication
Authentication is complex, and definitely a topic for a separate, deep-dive article.
For now, it's enough to say that ZAP authentication can handle pretty much any authentication mechanism.
The good news is that you can test authentication handling in the OWASP ZAP desktop and see exactly what is going on. When you create a plan using that context, all of the authentication configuration is imported into the plan.
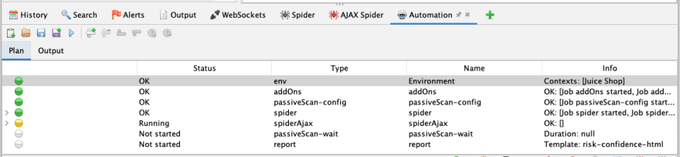
9. Testing Your Plan Locally
You can run the authentication plan you have created in ZAP using the “Run Plan…” button.
Running the plan also lets you see the jobs status:
If any of the jobs fails, you can investigate them in the ZAP desktop.
Sometimes, jobs will appear successful but they are not doing what you expected.
That is why the ZAP Automation Framework supports job outcome tests. These tests can be added to any job and can do things like:
- Check any of the ZAP statistics
- Check if specific alerts are present or absent
- Check if specific URLs have been found and optionally check their content
Statistical tests are added by default to the spider jobs.
You can add more tests to any of the jobs using the “Add Test…” button (or remove with a “Remove Test…” button). Don’t forget that double-clicking any of the tests in the plan lets you edit them.
10. Running in CI/CD
You can run AF tests from the OWASP ZAP command line using a command like:
zap.sh -cmd -autorun plan.yaml
You can also run them in docker. If you are using the stable image then we recommend updating ZAP using a separate command:
docker run -v $(pwd):/zap/wrk/:rw -t owasp/zap2docker-stable bash -c "zap.sh -cmd -addonupdate; zap.sh -cmd -autorun /zap/wrk/plan.yaml"
The $(pwd):/zap/wrk/:rw part of the command maps your local CWD to the directory /zap/wrk in the docker container.
If you use any scripts in your plan then you will need to make sure they are in or below your local CWD and change your plan so that they are referenced via the location they appear in the docker container (i.e. under /zap/wrk).
» Learn about our stack with pre-baked OWASP ZAP and the best cloud-native OSS Security Tools
OWASP ZAP Automation & Jit: A Winning Combo
While OWASP ZAP is an extremely powerful tool, it is very much a “point solution” and does not provide any scan scheduling, history, or an online interface.
For a more holistic approach, consider a DevSecOps orchestration platform like Jit, that integrates ZAP and other security tools.
By using Jit you can have your ZAP findings available in an aggregated dashboard with the rest of your security tooling, and receive greater context for the overall security posture of your application.


