Enhance MongoDB Security for Atlas With Scalable Tenant Isolation
Updated August 18, 2025

As a company building a SaaS security product, our inherent culture is not only focused on building best of breed security products for our users, but also ensuring that our systems, practices and workflows are engineered to support a continuously evolving threat landscape, and to protect our users’ data.
We’ve written about our design for tenant isolation for our serverless based architecture in the past, and practical methods to avoid data leakage between clients.
Multi-tenancy delivers benefits for optimal resource utilization, while at the same time it presents challenges with properly securing user data. This is compounded with serverless-based systems, where the actual servers and systems are out of our management control.
In this post, I’d like to demonstrate an additional method we employed for tenant isolation when working with MongoDB Atlas, that has provided our users with an added layer of data security.
When it comes to tenant isolation for any document-based database, solutions have been quite elusive–from MongoDB to AWS’ DocumentDB, this has mostly been achieved through (oftentimes leaky) code, as there are no document level IAM policies for documentDB.
This post will demonstrate a more robust and reliable method for MongoDB security through tenant isolation that can prevent data leakage between clients, without impacting performance. You’ll be able to access all of the configurations covered in this post, and try it yourself with a single-click deployment leveraging this repository.
How Tenant Isolation Improves MongoDB Security
Managing client data with third-party products always comes with its own set of unique challenges, based on the tool or platform. Document-based databases aren’t any different. The need for shared resources is obvious, with the growing cost and complexity of cloud. Leveraging shared resources can provide multiple benefits from both a utilization and cost perspective, likewise management and maintenance.
When it comes to document-based databases, and in our case this will be demonstrated through a MongoDB example, to date, the only method for tenant isolation has been by creating a database per tenant based on the platform’s own documentation, or code workarounds that aren't hermetic.
Not only is the database per tenant an extremely costly method for tenant isolation, it simply does not scale. Each Atlas project has up to 100DBs, albeit this can always be upgraded with additional costs. When we are talking about SaaS-based products with thousands and tens of thousands of users, there simply is no way to provide a database per user in a manageable way.
Let's look at some other ways to prevent data leakage across tenants and improve MongoDB security.
Where Code-Based Tenant Isolation Breaks Down
The method to apply tenant isolation through code usually entails sanitizing the user token from queries, providing a generic user ID and applying a filter clause for the tenant ID per query, in the hopes that the query will return only data related to that user.
But what happens if a developer forgets to add their tenant ID in a query? This method does not provide any guardrails or protections against data leakage, where with similar data and information, it is quite possible for one user to receive the data of another user. This is also possible with bugs in the code that may result in such issues.
Better Tenant Isolation for MongoDB
We wrestled with the challenge of tenant isolation to fortify MongoDB security for quite some time, until we came up with an interesting solution. MongoDB has invested quite a bit of engineering into their Data API capabilities, and this surprisingly delivered the solution we were looking for.
So just for some context on what the Data API actually is and how to use it; MongoDB has built the Data API to allow users to access data stored in their MongoDB Atlas clusters directly through HTTPS endpoints, without needing to write custom code or manage database connections.
This makes it possible to securely expose MongoDB data to web or mobile applications, or to integrate MongoDB with other services or platforms that support HTTPs requests. And in our case, it's particularly useful for building serverless applications or microservices where you want to avoid managing database connections or drivers.
One incredibly important feature that the Data API supports, that made it possible for us to practically achieve tenant isolation as a result, is their custom authentication feature that supports the very same JSON Web Token (JWT) used to authenticate to the SaaS application using the MongoDB authentication for app services.
This means that the JWT used by your SaaS application, is also the same token used by MongoDB to retrieve documents. Why does this matter for MongoDB security?
This is the beginning of what will enable tenant isolation, with a few more combined features. This shared JWT for your SaaS application and MongoDB backend, makes it possible to use the same key to access MongoDB as the user would access the UI and application frontend.
Tenant Isolation in Action - How to Apply It
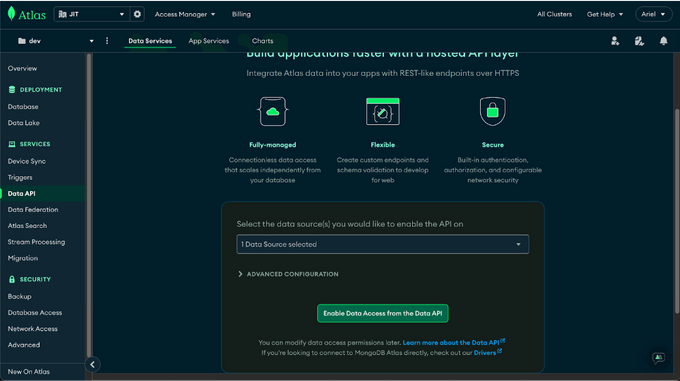

First navigate to the Data API in your MongoDB Atlas dashboard, and enable it by selecting the project upon which you want to enable it.
Note: It’s important to select “Local” as your deployment region, as we found out the hard way that when selecting the global option, it imposes latencies. Another good practice is to select a deployment region in close proximity to where your application is hosted.
Once created, navigate to the app services, and into the data app and follow the steps below to get your Data API properly set up.
- Navigate to HTTPs Endpoints > Data API > and enable the toggle for the Create User Upon Authentication setting.
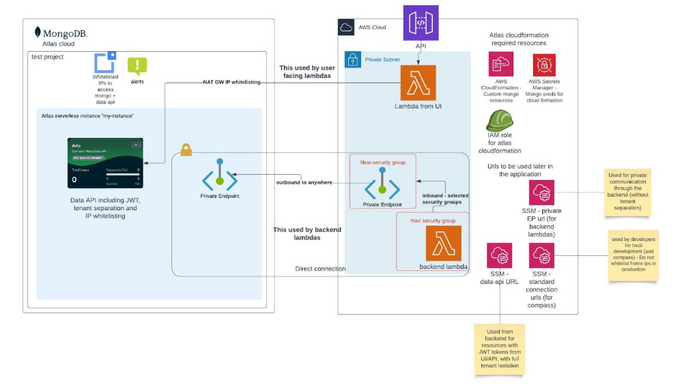
- Next, go to App Settings, and according to “Public-Facing Data API URL” to configure one of the following: a. Configure the private endpoint, this is too long for our post, but luckily MongoDB has some excellent documentation for how to get started. This prevents your data from being sent over the public internet. To properly configure your private endpoint and enable your resources Read/Write access to Mongo, you'll need your lambdas and resources to be in your VPC in order for them to communicate, and have access to the AWS private endpoint that you have just configured. b. Next you’ll need to configure IP whitelisting (you will also need to reference the MongoDB docs for this). By default, the data-api is open to anyone from the internet. Even with a JWT enabled, users will be able to access the API, albeit it will return a forbidden request. It's common to restrict IPs to access the data-api in addition to the private endpoint, this way non-whitelisted users will not be able to reach the endpoint. If you do not want to expose your MongoDB to all users with a JWT, you should also whitelist the backend (NAT Gateways for example). When you whitelist the backend, only those who access MongoDB through the backend APIs will have access to the data-api.
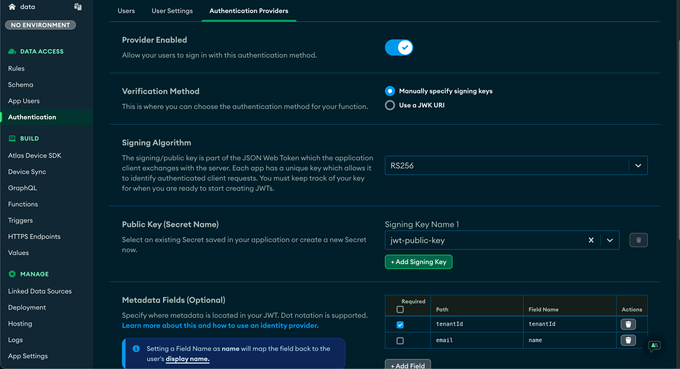
Below you can see the configurations for the JWT in the MongoDB dashboard. In order to properly get this configured follow the step by step guide below.
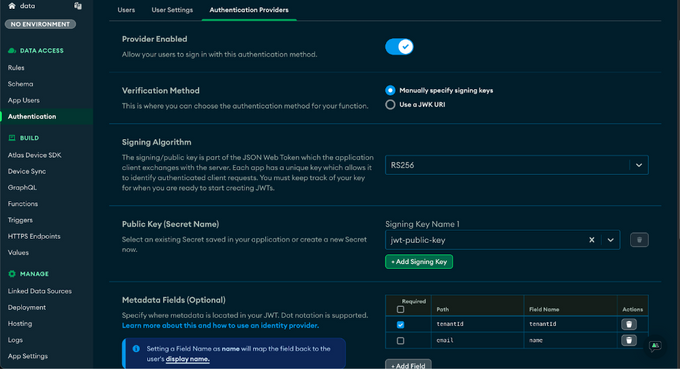
1. Navigate to the Authentication tab, and in the configurations enable “Custom JWT Authentication”

2. Under “Verification:, select the radio button: “Manually specify signing keys”, we detail the importance of this step in the Specify Keys Manually section below.
3. For the “add signing key” field, you should enter the public key used to validate your application users.
4. Perform mapping by specifying the relevant fields and values to use from your JWT, which will be the basis for what is later used by the Data API logic to perform tenant isolation.

a. Map your tenant ID / customer ID into a fieldName of your choice, we use “tenantId”.
b. It’s super important that all documents in your shared collection will include this tenant id field, as without them, your tenant isolation won’t output any results upon searches.
c. Map to the field name “name” a friendly name so you will be able to see under “App Users” a more friendly name.
Interesting note - the “sub” field is used to provision app services users - so different JWTs of same user should be considered as one user, there’s also no limit of amount of users that can be provisioned (after discussing with atlas support).
Enforcing Tenant Isolation
The shared JWT alone won’t provide the tenant isolation, however in tandem with MongoDB’s Rules features, which enables intelligent filtering, you can achieve the tenant isolation you require per user to improve your MongoDB security.
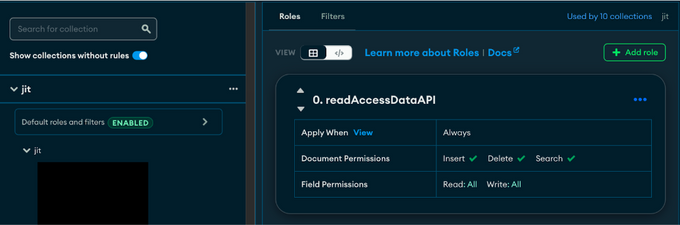
At Jit, we did this by navigating to Data Access >> Rules >> Roles. Here you need to verify that your users have the ability to insert, delete and search data. Here it’s possible to control what data users have access to, based on your applications needs.
In terms of tenant isolation, this can be achieved both by using the “Roles” option under Rules, or “Filters”. Roles will apply a role-based access control (RBAC) method of isolation, where this is applied to every document. We chose the Filters option (more intelligent filters can of course be applied, we chose to keep it simple), and created a tenant ID based filter, where we entered the following code snippets:
1. The first step requires the creation of a default role that grants access to documents. In order to achieve the tenant isolation we were aiming for, the permissions we defined included a full insert/delete/search permissions.
2. Then we applied a filter, this serves to ALWAYS append the filter prior to the query running, with the filter being the “tenant_id” from the JWT token. This will even override a false tenant_id that is maliciously or incorrectly added to a query.
Full JSON for filters and roles
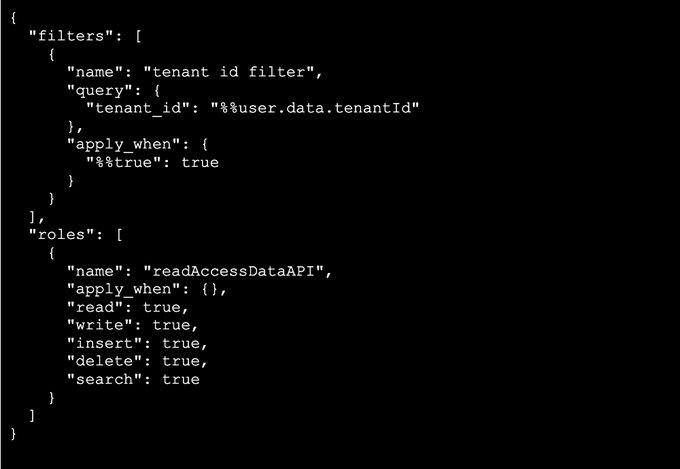
This means that every query that comes in is evaluated against this filter, where the `tenant_ID` parameter is mapped in our metadata table.
Leveraging and applying a filter to each query in the shared collection, where every document has a tenant ID based on the metadata we have stored per JWT, guarantees there will not be data leakage between tenants, even in a shared collection. It is preferable to use the “Filters” capability instead of the Roles-based rules, as this is the more performant method.
This means that any time a user queries data, and even if they try to manually replace the tenant ID, it will automatically be reverted to their own JWT-based tenant ID, this is also true if it was omitted accidentally.
Caveats & Gotchas for Tenant Isolation for MongoDB Security
While this seems like a fairly straightforward method to achieve tenant isolation, and it’s not clear why there isn’t more publicly available information on how to do this (as I discovered during my research in trying to implement such a solution), there are a few important configurations to pay attention to that will save you some pain and data quality issues when securing your MongoDB instance.
- Specify Keys Manually

While in the dashboard there is an option to select an automatic JWK URI specification, we’ve found that something in the process of calling this token leads to very slow retrieval and loading times.
When you manually specify the keys, it is by far more performant, and you will ensure no lag - literally zero latency - which data retrieval.
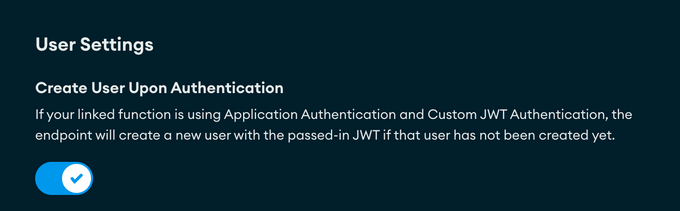
- Create User Upon Authentication
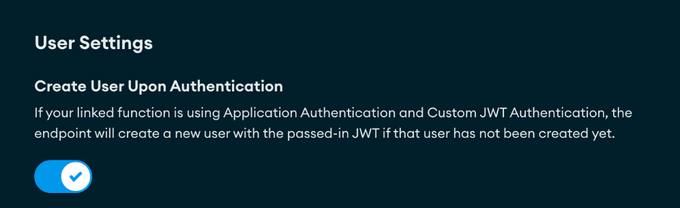
There is a very important toggle to select that will make or break this entire configuration and that is the “Create User Upon Authentication” toggle found under Custom HTTP Endpoints >> User Settings. If you do not check this, you will not have the user created upon authentication with the JWT, and users will not be provisioned, requiring additional API calls to provision the users (which you can avoid easily with this toggle). Not checking this toggle will prevent the seamless usage with the API, as users will not provisioned be, and as a result the API calls will fail.
- Speed of User Creation Because the user is created upon authentication (assuming you ticked the toggle above), in very rare cases, sometimes when documents are queried it will throw an error that the user does not exist, as the user has not been provisioned yet. To avoid this, it is recommended to retry the query on the client side, in order to avoid your systems throwing this embarrassing error.
- Filters and Not Roles The filter method is applied before requests are sent, making it significantly more performant than the role-based method. This means that the data and documents are pre-filtered even before the query is run, significantly reducing the number of documents and amount of data retrieved. In contrast the role method is applied to each document that is returned, so if you have ten thousand documents, this method will be applied ten thousand times, bogging down systems and impacting latency.
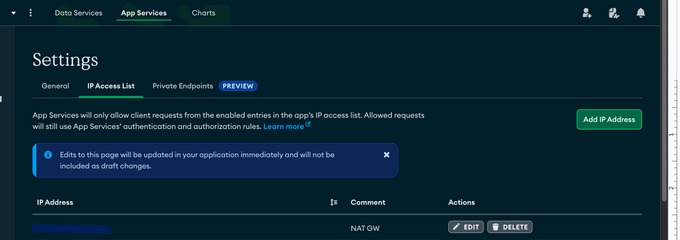
- Public-Facing Data API URL By default the Data API URL is available on the public web. While this URL will not return any data without a JWT, however, a security best-practice is to not enable access to this URL at all.
To prevent access to this URL, there are two options for your URL’s security:
- Navigate to App Settings >> IP Access List where you can create access lists - which enables you to define the IPs which will be a handful of addresses that originate from your VPC. This, however, is the less ideal option because it’s still available on the public web. Despite preventing access to any data, the URL will still be available, and it may also cause some network latency.
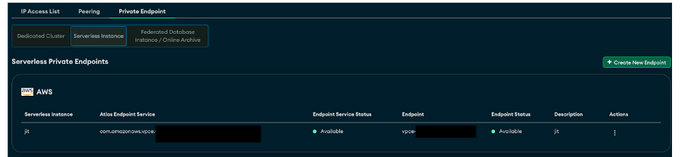
- The second option is navigating to App Settings >> Private Endpoints, where this feature enables the direct connection from your private network to your company’s virtual private cloud. This means you will not need to continuously manage and maintain an IP ACL. This also means that all of the traffic is direct through a direct private network that goes directly to your company’s AWS VPC, and by default will not access the public web at all, and therefore is a better and more secure practice. It’s important to note though that for serverless instances, there are no additional costs, however for dedicated instances, this may incur additional costs for "data transfer" fees. Whether running on serverless or dedicated instances, a private endpoint does come with an ongoing fee as well, when running on AWS (0.01$ per hour per availability zone).
BONUS SECTION - Backend Interaction with MongoDB
For backend flows, it is possible to generate a JWT token and use the data-api for interactions with MongoDB, however this is not commonly used, as constant bulk operations using the data-api can incur higher charges. At times where the flow is not directly triggered by the end user, there are more economical options of using the MongoDB driver directly, and interacting with the APIs natively.
There’s no document level tenant separation when working directly with the driver, but it’s still possible to restrict each workflow to have permissions for exactly what’s needed, similar to least privilege.
At Jit, we did not create a username/password combination for our lambdas, however they do use their own IAM roles in order to enable access to MongoDB.
For example, when running PyMongo (the native Python distribution for working with Mongo), a sample extension for your mongo connection string would be:

This method does not require any credentials to be supplied. You can find more details in the documentation.
Below are the methods used at Jit enabled in order to perform the heavy backend flows our operations required:
- We started by making sure our lambdas that interact with mongo are in a private subnet in our VPC (in the same manner as was done with our user facing APIs). This is done because otherwise these lambdas are exposed to the public internet through the API gateway, and this enables them to remain in a private subnet.
- Next we performed the following steps to create a private endpoint connection (link to docs), below is the step by step guide:
Start by creating a privateLink in AWS (note, this does incur additional AWS costs)
Next, you will need to also create the connection in your Mongo Atlas console:
Some Notes:
- When using private endpoints, no IP whitelisting will be required in Atlas. (So this is a very convenient method with less maintenance overhead).
- As of the writing of this post, the private endpoints for serverless instances are free, however they will incur costs for dedicated servers.
That goal was to make it possible for each of our lambdas to interact with Mongo with a set of minimal permissions for a collection.
For configuration management, we use Serverless Framework / Cloudformation, and Atlas has a nice project that lets you create Mongo resources through Cloudformation. The way this works, is the infrastructure is created to be consumed by other microservices that interact with them. It important to note that each of these microservices requires specific database roles to interact with the specific lambdas. Therefore, in order for these services to properly work with our Cloudformation and serverless.yml config, where it is also responsible for creating its own resources, its also important to ensure the services are configured to create the relevant database users for those services, when required.
This enables Mongo resources to be available through Cloudformation in your AWS account.
Important note: Collections and databases are not considered infrastructure resources, and are created on demand.
To enable this capability, i requires the creation of API keys (per specific project / organization you would like to manage in mongo-atlas).
This is in order for Cloudformation to be able to interact with Mongo and create resources for us.
Then, a secret is created in the AWS secret manager named ‘cfn/atlas/profile/<org-id>’ and saved those keys as a brand new AWS secret, in order to allow Cloudformation to create the necessary resources in MongoDB.

Then, we will need to enable the cloudformation custom modules we want, you can enable them here.
In this example, wW enabled `MongoDB::Atlas::CustomDBRole` and `MongoDB::Atlas::DatabaseUser`, as we wanted our microservices to create these roles for the respective service’s usage.
Upon activating it, you will need to first create an IAM role to interact with AWS, the only permission required for this role is: secretmanager:GetSecretValue, this will enable access to the specific secret resource named ‘cfn/atlas/profile/<org-id>’ created in the previous step.
Once you have completed this step, you will be able to use these resources in your Cloudformation deployment.
We will then create a custom user and role per lambda, which will ensure access is only provided for t specific collections and actions the lambda requires.
Important note: It’s recommended to reuse roles if there are several lambdas using the same exact permissions, as Mongo Atlas has a limit of 100DB users per project. (Note, it is possible to increase the limit without contacting support.)
When you ultimately create the lambda, note the name of the role you have used, and use the same one to pair with the resource. See the example below.:
Example of attaching a role and resource pair:

Important caveat here - as of the writing of this article, there’s a race condition on those resources, so if they are created in parallel (even for different lambdas) - the deployment might fail. To currently solve this, make sure each resource depends on the previous atlas one (a_role -> a_user -> b_role -> b_lambda)...
That’s it, your lambda can now interact with mongoDB through its own IAM role, and through a private endpoint.
Configure an entire project and data-api in terraform
In Jit - we never manually creating any infrastructure - because we want to replicate configurations between different environments.
We created a mongo terraform deployment that configures everything in the article, including:
- Enabling mongo atlas cloudformation custom resources for DB user and Role
Configure IP whitelist for developers access, and automatically configuring NAT GW IPs for data-api IP whitelist
Create 2 way private endpoint both in atlas and AWS - to allow our backend lambdas to access without going through the public internet
Configure all relevant alerts including pricing - to be sent to a single email address (can be adjusted for slack, etc..)
Full data-api configuration including JWT, and filtering for tenant separation
Note that the data-api configuration was replicated from Atlas console, there was no guide of how to do this.
You can find everything that was covered in this post, configurations and setup in this GitHub repository.
Tenant Isolation for Document Databases is Possible!
To sum it up, to date, it has been quite challenging to apply tenant-isolation to document-based databases. MongoDB’s incredible investment in their Data API technology has made this use case possible through its powerful features, capabilities, and flexibility.
Through its unified authentication method of the JWT, along with custom definitions, it’s now possible to leverage the same tools for your SaaS applications, as your data store, and to protect your users’ data within MongoDB at the same time.
There are some unique challenges with applying this tenant isolation method that we learned the hard way, and we have shared them here to ensure that those looking to apply similar capabilities can bypass those gotchas––and more easily get started with isolating your client data to improve MongoDB security.