How to Run a SAST Test with Bandit and Jit
Learn how to run a SAST test with Bandit and JIT, and take your Python code security to the next level.
Published June 5, 2024

AI Summary
As technology advances, security threats also increase. Software development teams cannot ignore security measures anymore. A small mistake can lead to a catastrophic data breach, damaging the organization's reputation and finances. Instances like Capital One and Marriott's major data violations due to exposed secrets testify to this fact.
In this article, we'll introduce you to a powerful open-source tool called Bandit that can help you detect and prevent vulnerabilities in your code. We'll also show you how to automate Static Application Security Testing (SAST) using Bandit and Jit, making it easier to secure your code. With these tools, you can feel confident that your software is secure and your organization is protected.
How SAST helps developers
Static Application Security Testing (SAST) is an invaluable tool for developers who want to write clean, secure code. It enables you to find and fix security issues in your code before they become problematic.
It's like having a team of security experts by your side, checking your code for potential issues and alerting you to any problems.
SAST analyzes your application's source code and identifies potential security vulnerabilities based on predefined rules.
Benefits of using SAST
- A SAST test helps you identify and fix issues early in development, saving you time and frustration in the long run.
- You can focus on writing clean, efficient code without worrying about security.
- Knowing that your code is secure and ready for deployment gives you peace of mind.
» Make an informed decision: SAST or DAST for your web app?
What is Bandit?
Bandit is an open-source SAST that helps identify security issues in Python code using predefined rules. It is part of the OpenStack Security Project and is specifically designed to find bugs in Python code that could lead to security vulnerabilities.
It is executed from the command line and can be integrated into continuous integration (CI) workflows to provide ongoing security checks as developers write code.
Bandit is often used with other security tools, such as PyLint and PyCodeStyle, to provide a more comprehensive security analysis of Python code.
This makes it an essential tool for anyone serious about ensuring the security of their Python applications.

Using Bandit through Jit
Jit was built to enable developers to easily integrate great open-source tools like Bandit into their CI/CD workflows and pipelines.
Running Bandit with Jit is simple and effective. There’s no need for any additional installation or interaction with Bandit itself. Add your repository, and Jit will automatically run Bandit as part of its continuous security checks whenever you create a new pull request in GitHub. You can view the results of the Bandit checks in the pull request conversation, where Jit will display any security findings in a unified format.

Open ASPM Platform
App + cloud security that developers love
Read reviewsCoverage
SAST, SCA, secrets detection, IaC scanning, DAST, CSPM, and other product security controls
Easy for developers to adopt
Automated scanning within dev environments
Automated prioritization
Automatically surface exploitable vulnerabilities in production
Easy onboarding
Integrate Jit with your Source Code Manager to enable one-click activation for all tools
Brief overview
Jit empowers developers to consistently and independently resolve vulnerabilities before production with automated scanning in their environment.
Rather than requiring developers to scroll through long vulnerability backlogs in different UIs, Jit provides immediate feedback on the security of every code change within GitHub, GitLab, or VsCode.
As a result, Jit makes it exceptionally easy for developers to adopt regular security testing within their environment.
Key features
- Unified SAST, SCA, secrets detection, IaC scanning, CSPM, DAST, and other product security controls
- Unified execution and UX for all security tools
- Fast and automated scanning within GitHub, GitLab, or VsCode
- Jit’s Context Engine determines whether a vulnerability is actually exploitable in production to prevent alert fatigue and long backlogs of irrelevant vulnerabilities
- Unified monitoring and reporting
Pros and cons
Easy for developers to adopt
Unifies all tools
Automated vulnerability prioritization based on runtime context
Fast onboarding across all repos
Not open source
How to Run a SAST Test with Bandit and JIT
To run a SAST test with Bandit and Jit, you will need to perform the following steps:
Step 1: Configure your Jit Account
Set up a JIT account and create a Minimal Viable Security (MVS) plan for your application. This step will involve specifying the security tools and workflows you want Jit to use when running security checks.
Step 2: Set up a GitHub Repository
Create a GitHub repository for your application and link it to your Jit account so that Jit can monitor your code changes and run security checks automatically when you create pull requests.
Step 3: Create a Pull Request
Create a pull request in your GitHub repository with the code changes you want to test.
Here is an example of a pull request process:
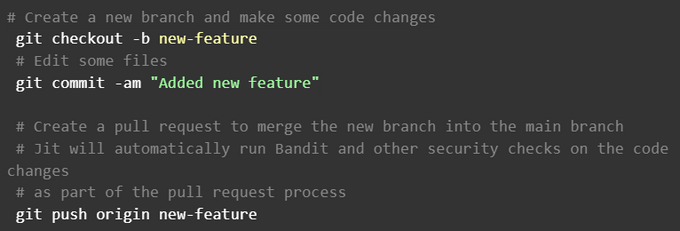
Step 4: Run Bandit and Security Tools
Jit will automatically run Bandit and any other configured security tools on your code change as part of the pull request process.
Step 5: Check the Security Check Results
Jit will display the results of the security checks in the pull request conversation, including any issues found and their severity levels.
Considerations when running a SAST Test with Bandit and JIT
JIT, Bandit, OWASP Dependency Check, and Gitleaks are tools that help scan your Git repository for security vulnerabilities and sensitive data. They present their findings in a unified report that includes severity, issue type, and source tool information.
If a Jit security check fails, it means some security requirements are not met. Address the issues or ignore false positives. Once resolved, you can merge to combine your secure code changes.
Integrating Bandit with Jit automates security checks and helps catch issues early. A web app provides a detailed view of scans, logs, and actions. These tools enhance the security posture and keep the codebase secure.
» Looking to improve your SAST scanning? Here's how setting up Semgrep rules helps.
Step-by-Step Guide on Running Bandit Manually on Your Application
Step 1: Install Bandit
To manually run Bandit, install it first using the command:
Pip install bandit
Step 2: Run Bandit
Use the Bandit tool from the command line and specify the directory path or file you want to scan. The command for this is:
bandit/path/to/application
Step 3: Troubleshooting
If you encounter errors and cannot run Bandit despite having it installed, prefix your commands with python -m. For instance:
python -m bandit /path/to/application
Note: Running Bandit manually means that you, as a developer, are responsible for regularly maintaining the pace of scans. On the contrary, using tools like Jit only require you to add your repo to the platform, and they take care of the rest.
Also, be aware of insecure code that uses hardcoded credentials, as these pose additional potential vulnerabilities. Here is an example of such code:
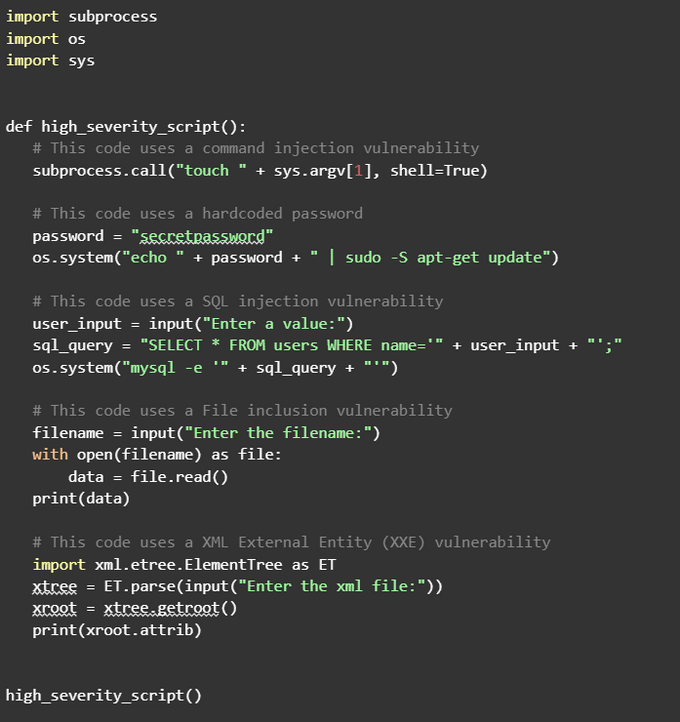
When you run bandit on this code, it should generate a security alert:
bandit issues.py
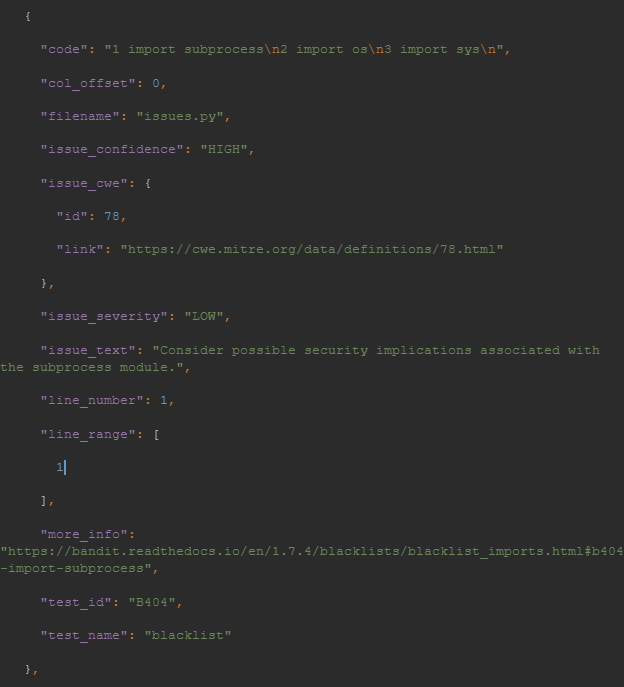
Here is an example bandit test result based on the above code and command:
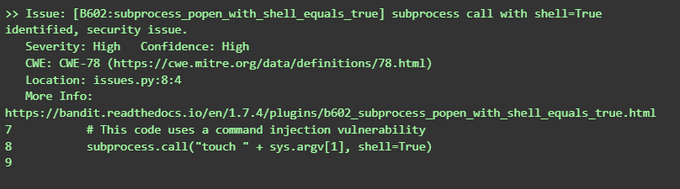
To see the complete output, please visit pastebin.
The Bandit documentation provides a complete list of the available command line arguments and their meanings
Bandit SAST Test results
Bandit SAST test results provide developers with a detailed report of the security checks performed on their applications. The report includes
- Code scanned: Lists scanned files and directories, along with the number of analyzed code lines
- Test results: Lists security issues found by Bandit, including their severity level, type, and description.
- Run metrics: Provides summary statistics about the Bandit run results, including the total number of issues by security and confidence level.
Creating a Baseline with Bandit
A baseline is a previous security scan, and creating a baseline with Bandit establishes a reference point for code security. The baseline can be compared with new scans to track changes and identify vulnerabilities.
The command to create a baseline file using Bandit is:
[.code]python -m bandit -r <target_file_or_directory> -f json ><baseline_file>.json
For example, if you want to scan the file issues.py and create a baseline file named baseline.json, the command would be:
[.code]python -m bandit -r issues.py -f json > baseline.json[.code]
To run Bandit against the target and compare results to the baseline report, use:
[.code]python -m bandit -r issues.py -b baseline.json -f json > change.json[.code]
Here’s an example of the JSON generated in change.json:
To see the complete output, please visit pastebin.
Bandit Severity and Confidence Levels Management
Bandit uses severity and confidence levels to measure the security issues identified during a SAST test. Developers can prioritize and address issues based on their potential impact on the application's security.
- High: High issues are critical and should be addressed immediately.
- Medium: Medium issues are also critical but less urgent than high-severity issues
- Low: Low issues are less important and may not pose significant risks to the application's security.
Bandit Settings for Control Integration
Bandit has several settings you can use to customize its behavior when running security checks on your application. These settings can be specified using command line arguments or through configuration files. Here is a list of some available Bandit settings:
- Severity level: Specify with [.code]--severity-level[.code] to report issues of a given severity level or higher.
- Confidence level: Indicate with [.code]-i[.code], [.code]--confidence:[.code] to report only issues of a given confidence level or higher
- Excluded files: Use [--exclude] [.code]--exclude[.code] to ignore specific files/directories during checks
- Included files: Use [.code]--include[.code] to scan certain files/directories instead of the entire application.
- Configuration files: Specify Bandit settings in a structured way using configuration files, indicated by [.code]--ini[.code]
- Output format: Specify the output report structure that Bandit produces using [.code]-f[.code]
For all the available flags for Bandit, run bandit [.code]--help[.code] in your terminal to get the entire list.
Make security work for you
Automate your SAST tests with tools like Bandit and JIT to make security less of a hassle. This allows your team to focus on writing quality code while tracking and resolving vulnerabilities. Set up an MVS plan linked to your GitHub repository so Jit can automatically execute security checks when you make code changes.
With Jit's automated remediation feature, you can fix security issues within the pull request, saving time and reducing the risk of new vulnerabilities. See Jit in action for free.


